Branching in Git
Daniel Barowy, Williams College, ©2018
The git version control tool has a feature called a branch. A branch is essentially a copy of the source code from a given point in time. Branches are particularly useful in the following scenarios:
- Multiple people are working on the source code simultaneously.
- You are working to implement an experimental feature that you may later decide to undo.
- You decide that the
masterbranch is only for well-tested code destined for release. - Each production release of a program is given its own branch.
And so on. There are many uses for branches. If you’re ever found yourself copying code to another folder so that you could undo it later, you really should be using branches instead. git is better at tracking your files than you are.
tl;dr Version
If you already know what branching is and just need a refresher, here are the commands described in this tutorial:
- Create a new branch and switch to it:
git checkout -b <branchname> - Switch branches:
git checkout <branchname> - Merge changes into the current branch:
git merge <name of other branch>
Otherwise, read on.
Tutorial
Suppose you have a source code repository with the following commits.
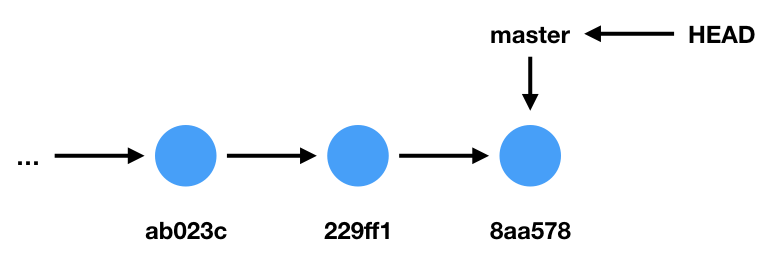
This diagram shows the last three commits in our repository. Recall that a commit is a snapshot of a repository during a point in time, and that each commit is identified by a random hexadecimal number such as the ones shown in the diagram.
In this diagram, all commits are currently in the default branch, which is called master. In this case, the HEAD pointer points to the branch pointer master. HEAD tells you which branch we are currently editing. In this case, the current branch is master.
Creating a new branch
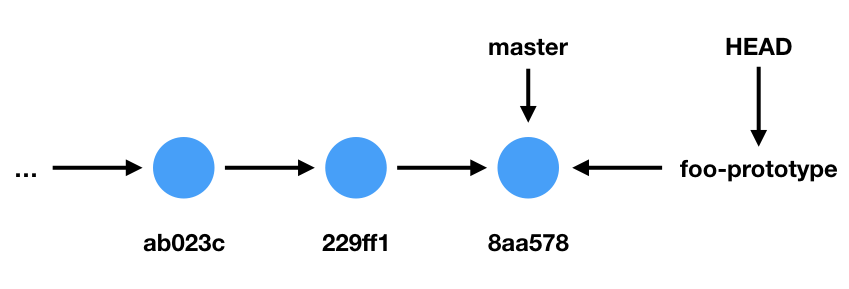
Imagine that we now want to implement a new feature: a function called foo. But because this feature may take some time to implement, and because other people are actively working on the codebase, we decide to work in a new branch. So create a new branch called “foo-prototype”:
$ git checkout -b foo-prototype
The above command creates a new branch called foo-prototype and switches development to that new branch. Since we have not yet committed anything to our new branch, foo-prototype is essentially just a copy of the master pointer. But because HEAD also points to foo-prototype, that means that when we commit new code, that code will be added to the foo-prototype branch.
The following diagram shows the state of our repository after running the above commannd.
Switching branches
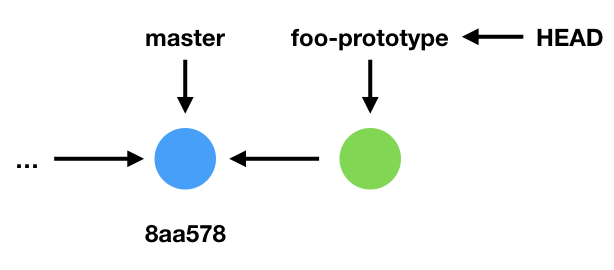
You can always switch to another branch. For example, if we wanted to switch back to master, we would run
$ git checkout master
and if we wanted to switch back to foo-prototype we would run
$ git checkout foo-prototype
In each case, all that happens is that git moves the HEAD pointer.
Merging
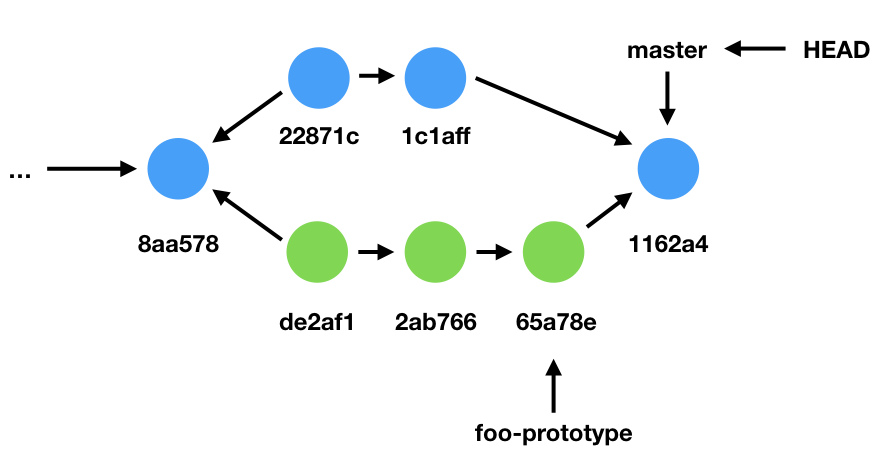
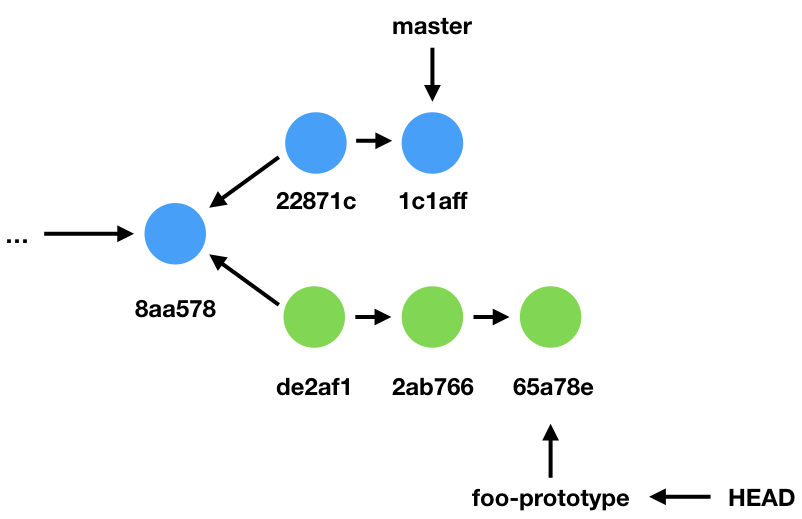
Now suppose we modify our source code—perhaps we’ve implemented a draft of our foo function—and we’ve committed it to our repository. This diagram shows the updated state of our repository. Notice that foo-prototype has now diverged from master.
Let’s suppose that we continue on in this manner for awhile longer, committing things to our foo-prototype branch. Additionally, let’s suppose that our collaborators have also been busy, adding things to our master branch in the meantime.
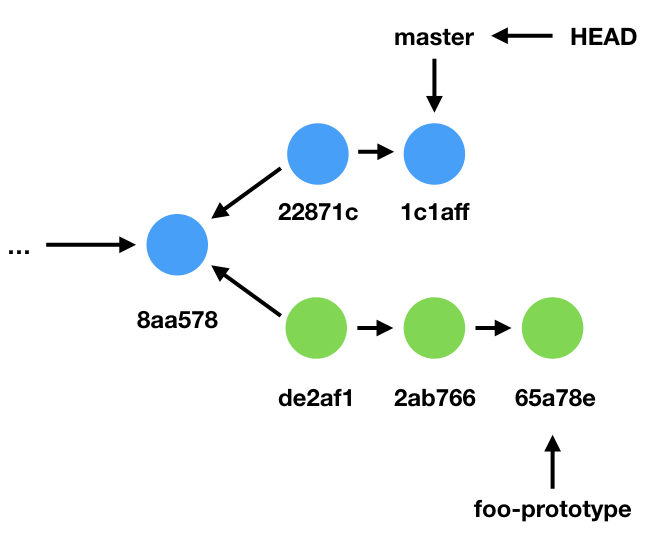
Finally, the big day arrives, and our foo-prototype is done. We want to bring our changes back into the master branch.
To merge foo-prototype back into master, first we switch back to the master branch.
$ git checkout master
Note that HEAD now points at master.
Next, we ask git to merge the changes from foo-prototype into the branch pointed to by HEAD.
$ git merge foo-prototype
If neither master nor foo-prototype have any changes to the same file, then the merge will happen automatically and you will be left with a new set of changes that you can commit.
Dealing with merge conflicts
It is much more likely, though, that there is a file that was edited in both branches. In this case, git needs your help to merge the two sets of files. This is called a merge conflict. Merge conflicts are not something to fear—rather, think of them as a helpful feature. git is telling you that the merge went fine except for a handful of files.
For example, suppose the file filezzz was modified in both master and in foo-prototype. After asking git to merge, we will see a message like the following.
$ git merge foo-prototype
Auto-merging filezzz
CONFLICT (content): Merge conflict in filezzz
Automatic merge failed; fix conflicts and then commit the result.
Running git status will show the conflicting files.
$ git status
On branch master
You have unmerged paths.
  (fix conflicts and run "git commit")
  (use "git merge --abort" to abort the merge)

Unmerged paths:
  (use "git add <file>..." to mark resolution)

	both modified:   filezzz

no changes added to commit (use "git add" and/or "git commit -a")
Upon opening filezzz in our editor, we see that git helpfully marked the region of the file that is in conflict.
Some stuff
<<<<<<< HEAD
Some other more stuff
=======
Some more stuffs
Stuff
>>>>>>> foo-prototype
Some other stuff
What this says is that the entire file is the same except for a tiny region. In HEAD, that region contains
Some other more stuff
and in foo-prototype that region contains
Some more stuffs
Stuff
To merge, we decide what we want (e.g., “I think Stuff is fine for now”), and so we _replace the entire region between <<<<<<< HEAD and >>>>>>> foo-prototype, inclusive. The file now contains:
Some stuff
Stuff
Some other stuff
git looks to see that you’ve removed the <<<<<<< and >>>>>>> markers to know when you’ve resolved a merge conflict. Now we can commit those changes.
$ git commit -am "merge"
[master 116d2a4] merge
Finally, our repository is in the following state and we are done.